어제에 이어서 RecycleView 설명 2편!
2023.01.05 - [개발] - (18) 독학으로 앱 만들어보기 (RecycleView 1편)
(18) 독학으로 앱 만들어보기 (RecycleView 1편)
23년이 되었네요. 새해 복 많이 받으세요. 지난 글에 이어서 적어보겠습니다. 지난 글에서 2개의 의문점을 남겼는데 그중에서 RecycleView는 어떻게 사용하는 거지? 에 대한 의문점을 해소해 본다.
dev-nasus.tistory.com
어제에 이어서
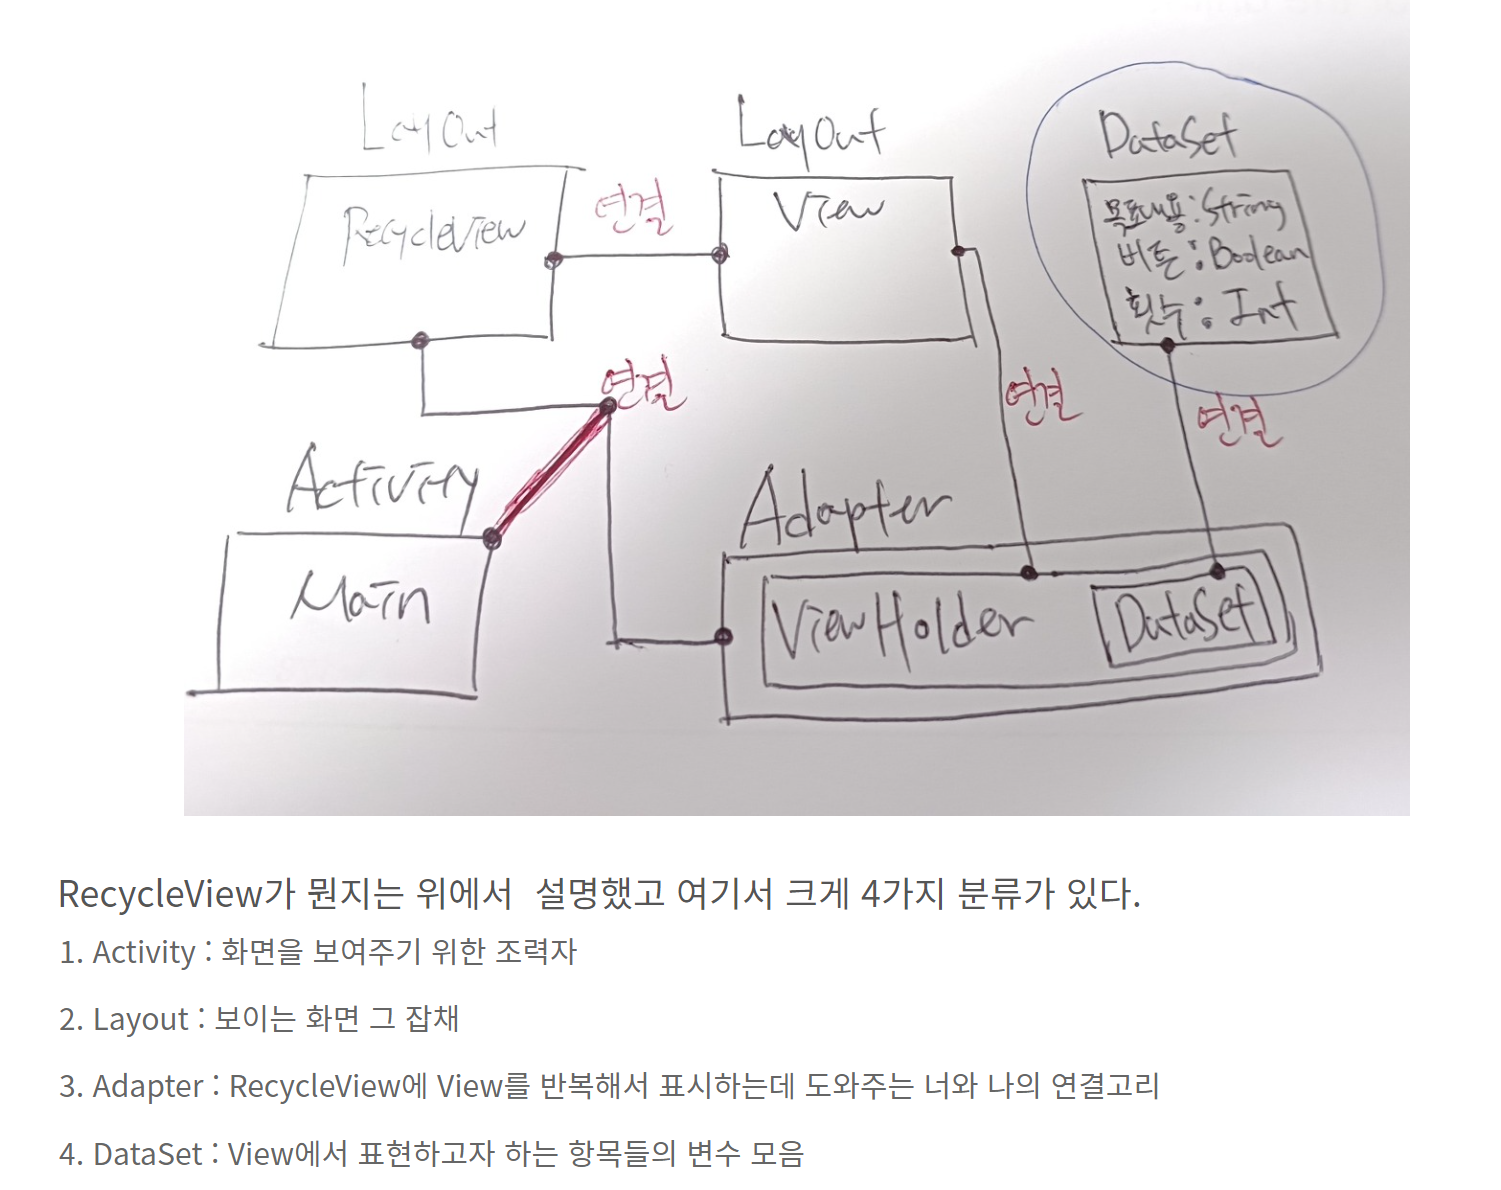
Activity, Layout, Adapter, DataSet 4가지를 코딩과 함께 설명을 한다. 코딩 순서는 아래와 같다. 이 글에서는 3번까지만 설명한다. 코딩 레스기릿.
[코딩 순서]
1. RecycleView Layout -> 2. View Layout -> 3. RecycleView와 View 합체! -> 4. DataSet -> 5. Adapter에서 Layout과 DataSet 합체! -> 6. Activity에서 Adapter와 보여줄 화면 Layout 결합!
1. RecycleView Layout
보이는 화면 만드는 작업이다. 그중에서도 RecycleView를 보여줄 Layout을 먼저 구현한다. 아래 그림처럼 보이게 XML 코드를 입력했다. 파일 이름은 goal_list.xml 로 정했고, 하단에 버튼 외에 공간이 전부 RecycleView 공간으로 사용하기 위해 layout_height를 0으로 설정하고, layout_weight를 1로 설정했다. 주석된 코드는 밑에서 추가로 설명한다.

구현 코드 (goal_list.xml)
<?xml version="1.0" encoding="utf-8"?>
<LinearLayout xmlns:android="http://schemas.android.com/apk/res/android"
    xmlns:tools="http://schemas.android.com/tools"
    android:layout_width="match_parent"
    android:layout_height="match_parent"
    xmlns:app="http://schemas.android.com/apk/res-auto"
    android:orientation="vertical"
    tools:context=".MainActivity">

    <androidx.recyclerview.widget.RecyclerView
        android:id="@+id/list_goal"
        android:layout_width="match_parent"
        android:layout_height="0dp"
        android:layout_weight="1"
        android:orientation="vertical"/>
<!--        app:layoutManager="androidx.recyclerview.widget.LinearLayoutManager"-->
<!--        tools:listitem="@layout/goal_item"-->
<!--        />-->

    <LinearLayout
        android:layout_width="match_parent"
        android:layout_height="wrap_content"
        android:orientation="horizontal">

        <Button
            android:id="@+id/btn_add_goal"
            android:layout_margin="10dp"
            android:layout_width="0dp"
            android:layout_height="wrap_content"
            android:layout_weight="1"
            android:text="목표 추가"/>

        <Button
            android:id="@+id/btn_del_goal"
            android:layout_margin="10dp"
            android:layout_width="0dp"
            android:layout_height="wrap_content"
            android:layout_weight="1"
            android:text="목표 삭제"/>

    </LinearLayout>
</LinearLayout>
2. View Layout
RecycleView에서 반복해서 사용할 View를 구현한다. 화면 이름은 goal_item.xml로 정했다. 사용할 뷰는 지난 포스팅에서 지정해놨던 1) 목표 내용 2) 라디오 버튼 3) 목표 입력 횟수 이렇게 3가지다.

구현 코드 (goal_item.xml)
<?xml version="1.0" encoding="utf-8"?>
<LinearLayout
    xmlns:android="http://schemas.android.com/apk/res/android"
    xmlns:tools="http://schemas.android.com/tools"
    android:layout_width="match_parent"
    android:layout_height="wrap_content"
    android:orientation="horizontal"
    tools:context=".MainActivity">

    <LinearLayout
        android:layout_width="0dp"
        android:layout_height="wrap_content"
        android:layout_weight="1"
        android:orientation="vertical">

        <TextView
            android:id="@+id/text_goal_content"
            android:layout_margin="10dp"
            android:layout_width="wrap_content"
            android:layout_height="wrap_content"
            android:textSize="24sp"
            android:text="목표 내용"/>

        <TextView
            android:id="@+id/text_goal_count"
            android:layout_margin="10dp"
            android:layout_width="wrap_content"
            android:layout_height="wrap_content"
            android:textSize="14sp"
            android:text="목표 입력 횟수"/>

    </LinearLayout>

    <RadioButton
        android:id="@+id/radio_is_now_goal"
        android:layout_gravity="center"
        android:text=""
        android:checked="false"
        android:layout_width="50dp"
        android:layout_height="50dp"/>

</LinearLayout>
3. RecycleView와 View 합체!
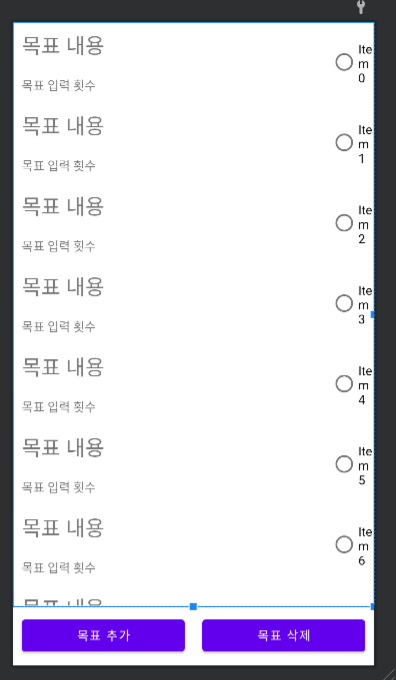
이제 RecycleView에서 반복 사용할 View가 어떤건지 알려줘야 한다. 그 코드는 위에서 주석 처리 했던 코드다. app:layoutManager 라는 키워드를 통해 RecycleView의 Layout 형태를 지정해 준다. tools:listitem 이라는 키워드에는 우리가 반복해서 보여줄 View의 파일 이름을 입력해 준다.
        app:layoutManager="androidx.recyclerview.widget.LinearLayoutManager"
        tools:listitem="@layout/goal_item"
goal_list.xml 파일에서 주석을 없애고 구현하면 아래와 같이 View가 반복해서 미리 보기 된다.
구현 코드 (goal_list.xml)
<?xml version="1.0" encoding="utf-8"?>
<LinearLayout xmlns:android="http://schemas.android.com/apk/res/android"
    xmlns:tools="http://schemas.android.com/tools"
    android:layout_width="match_parent"
    android:layout_height="match_parent"
    xmlns:app="http://schemas.android.com/apk/res-auto"
    android:orientation="vertical"
    tools:context=".MainActivity">

    <androidx.recyclerview.widget.RecyclerView
        android:id="@+id/list_goal"
        android:layout_width="match_parent"
        android:layout_height="0dp"
        android:layout_weight="1"
        android:orientation="vertical"
        app:layoutManager="androidx.recyclerview.widget.LinearLayoutManager"
        tools:listitem="@layout/goal_item"
        />

    <LinearLayout
        android:layout_width="match_parent"
        android:layout_height="wrap_content"
        android:orientation="horizontal">

        <Button
            android:id="@+id/btn_add_goal"
            android:layout_margin="10dp"
            android:layout_width="0dp"
            android:layout_height="wrap_content"
            android:layout_weight="1"
            android:text="목표 추가"/>

        <Button
            android:id="@+id/btn_del_goal"
            android:layout_margin="10dp"
            android:layout_width="0dp"
            android:layout_height="wrap_content"
            android:layout_weight="1"
            android:text="목표 삭제"/>

    </LinearLayout>
</LinearLayout>
여기까지 하면 이 글에서 목표했던 3번까지 작업이 완료됐다. 다음 글에서는 Layout XML 코딩이 아닌, Kotlin을 사용하여 코딩을 진행한다.
[다음 코딩 순서]
1. RecycleView Layout -> 2. View Layout -> 3. RecycleView와 View 합체! -> 4. DataSet -> 5. Adapter에서 Layout과 DataSet 합체! -> 6. Activity에서 Adapter와 보여줄 화면 Layout 결합!
'개발' 카테고리의 다른 글
| (21) 독학으로 앱 만들어보기 (코틀린 sqlite select) (0) | 2023.01.23 |
|---|---|
| (20) 독학으로 앱 만들어보기 (RecycleView 3편) (2) | 2023.01.08 |
| (18) 독학으로 앱 만들어보기 (RecycleView 1편) (0) | 2023.01.05 |
| (17) 독학으로 앱 만들어보기 (개발 과정) (2) | 2022.12.03 |
| (16) 독학으로 앱 만들어보기 (입력, 화면 구성) (1) | 2022.12.02 |


댓글